PN.EXE is a graphical Win32 application that lets you acquire, display, overlay, caption, and print noise plot (.PNP) files.
It offers many of the capabilities provided by Agilent’s 85671A phase-noise measurement package.
The current version of PN supports the following spectrum analyzer models:
PN is able to support the “classic” models like the HP 8566 because it runs on a GPIB-connected host PC, rather than the analyzer's own internal processor. Even when running on an $83,000 HP 8565EC, the Agilent noise-measurement software can’t take advantage of the control, display, and connectivity options available on a modern PC.
PN.EXE is part of the KE5FX GPIB Toolkit. The latest version of the Toolkit is downloadable here.
Prerequisites
Although PN is very easy to use, the art of making valid, repeatable noise measurements demands an understanding of the limitations of the instruments and processes involved. HP application note AN 270-2 is strongly recommended to users who are new to PN and phase-noise measurement in general. Don't be put off by its focus on a particular analyzer -- this is the best app note on the subject that I've seen.
For more information, see Hewlett-Packard's Phase Noise Measurement Seminar course notes (124 pages, 7 MB), as well as the other references mentioned in the GPIB Toolkit FAQ.
Running PN
Depending on the options you selected during installation, you can run PN.EXE from the Start menu, by clicking on its desktop shortcut, or by using its Quick Launch icon on the taskbar. You can also run PN.EXE from a DOS-box command line or Windows Start->Run... command, optionally specifying the filenames of one or more existing .PNP files. Use quotes around filenames that contain spaces -- for example,
      PN "synth test.pnp"          ... Display "synth test.pnp" by itself
      PN before.pnp after.pnp      ... Overlay before.pnp and after.pnp
      PN (no command-line options) ... Attempt to reload the last-viewed set of .PNP files, if any
Menu Commands and Keyboard Shortcuts
Note that many of the menu commands in PN have equivalent keyboard shortcuts, useful on crowded lab benches that don’t have room for a mouse.
     Key               Menu Command                          Remarks

     l                 File->Load PNP data...                Load and display a new .PNP file.  Up to 8 acquisitions may be loaded at once
     s                 File->Save image or PNP data...       Save a .GIF, .TGA, .BMP, or .PCX, or a copy of the currently selected .PNP file

     x                 File->Export smoothed trace to .TXT or .CSV file
                                                             Save the currently selected trace as a list of comma-separated
                                                             offset (Hz), amplitude (dBc/Hz) pairs.  If the .TXT suffix is used,
                                                             each offset,amplitude pair will be followed by a CR/LF

     p                 File->Print image                     Sends the current display to the default Windows printer

                       File->Sort file dialogs by modification date
                                                             Causes file listings to be sorted by modification date by default, rather than
                                                             by filename

     Delete            File->Close current plot              Remove current .PNP file from display list, without deleting it

     Home              File->Close all visible plots         Close all loaded .PNP files.  This command does not delete
                                                             any files; it simply removes them from PN.EXE's current display list.

     Ctrl-Delete       File->Delete current .PNP file        Remove current .PNP file from display list, deleting it permanently

     q or Esc          File->Quit

     b                 View->Browse sources one at a time    Surf through all loaded .PNP files without overlaying them
     o                 View->Overlay all sources             Display up to eight .PNP files at once

     + or down-arrow   View->Next source                     Advance selection to the next .PNP file
     - or up-arrow     View->Previous source                 Go back to the previous .PNP file

     Ctrl-up-arrow     View->Move selected source up         Move selection up in the list of loaded .PNP files
     Ctrl-down-arrow   View->Move selected source down       Move selection down in the list of loaded .PNP files

     v                 View->Toggle visibility of selected source
                                                             Allows you to temporarily remove a trace from the
                                                             display without closing it; useful when comparing
                                                             traces in displays with numerous overlaid sources

     5                 Display->512 x 384                    Adjust window area to one of several standard sizes
     6                 Display->640 x 480                    (These commands are particularly useful when you’ve
     7                 Display->800 x 600                    selected too many entries with the Legend menu,
     8                 Display->1024 x 768                   causing the table to grow beyond the confines of the
     9                 Display->1152 x 864                   window)
     0                 Display->1280 x 1024

     C                 Display->High contrast                Toggle between low-contrast and high-contrast display modes for best
                                                             legibility on various displays and printers

     Ctrl-0            Trace->No smoothing                   No smoothing is applied to the visible trace(s)

     Ctrl-1            Trace->2-point smoothing              Smooth by averaging the specified number of adjacent trace points
     Ctrl-2            Trace->4-point smoothing              at each pixel
     Ctrl-3            Trace->8-point smoothing
     Ctrl-4            Trace->16-point smoothing
     Ctrl-5            Trace->24-point smoothing
     Ctrl-6            Trace->32-point smoothing
     Ctrl-7            Trace->48-point smoothing
     Ctrl-8            Trace->64-point smoothing
     Ctrl-9            Trace->96-point smoothing

                       Trace->Use alternate smoothing algorithm
                                                             Selects a different smoothing technique that provides greater
                                                             accuracy at the traces' left endpoint in certain situations

     Ctrl-s            Trace->Enable spur reduction          Helps reduce the influence of discrete spurs on traces,
                                                             at some cost in rendering speed

     t                 Trace->Set spur threshold in dB...    Allows you to specify the spur-detection threshold relative to
                                                             the average value of nearby trace points.  You can also
                                                             use ctrl-keypad- and ctrl-keypad+ to increment and decrement
                                                             the threshold while observing its effect on the displayed traces.
                                                             Excessive use of spur clipping will degrade overall accuracy!

     g                 Trace->Enable ghosting                Show or hide unsmoothed raw trace(s) behind smoothed trace(s)

     c                 Trace->Allow vertical clipping        Attempt to improve the legibility of traces by giving them more
                                                             vertical headroom

     e                 Trace->Edit caption...                Change or add a caption for the currently-selected trace
                                                             The trace's file will be updated automatically with the new caption

                       Legend->Trace                         Display trace caption
                       Legend->Filename                      Display trace filename
                       Legend->Carrier Hz                    Display frequency of carrier from which trace was acquired
                       Legend->Carrier dBm                   Display amplitude of carrier from which trace was acquired
                       Legend->dBc/Hz at Spot Offset         Display trace amplitude at spot on graph selected via left click
                       Legend->Residual FM Hz                Display DSB residual-FM amplitude between the integration cursors
                       Legend->RMS Integrated Noise (Degs)   Display DSB RMS phase jitter in degrees or radians for the area between
                       Legend->RMS Integrated Noise (Rads)   the integration cursors
                       Legend->RMS Time Jitter               Display the same phase-jitter value in seconds, based on the carrier frequency
                       Legend->SSB Carrier/Noise dB          Dislpay SSB power between the integration cursors, relative to the carrier level
                       Legend->Ext Mult                      Display external frequency multiplication factor, if any
                       Legend->Ext LO                        Display frequency of external LO, if any
                       Legend->Ext IF                        Display frequency of external IF, if any
                       Legend->RF Atten dB                   Display analyzer’s RF attenuator setting
                       Legend->Clip dB                       Display requested carrier-clipping value in dB
                       Legend->VBW/RBW                       Display video/resolution bandwidth ratio
                       Legend->Sweep                         Display total time taken by all sweeps during acquisition
                       Legend->Time/Date                     Display acquisition time/date stamp
                       Legend->Instrument                    Display spectrum-analyzer model designator
                       Legend->Rev                           Display spectrum-analyzer revision designator
                       Legend->All                           Select all displayable fields above
                       Legend->None                          Deselect all displayable fields above

                       Acquire-> ...  			     Acquire noise plot from various spectrum analyzer models

     Space             Acquire->Repeat last acquisition ...  Shortcut to return to most-recently-used acquisition dialog
Mouse Controls and Integration Features
Left-click anywhere within the graph to place the red "Spot Cursor" at the nearest vertical division. This cursor will be visible only if the Legend->dBc/Hz at Spot Offset option is selected for viewing.
Ctrl-left click within the graph to establish the lower integration-range offset for the Residual FM Hz, RMS Integrated Noise, RMS Time Jitter, and SSB Carrier/Noise options on the Legend menu. The blue integration-boundary cursors will be visible only if at least one of these options is selected for viewing. Like the Spot Cursor, the integration cursors automatically snap to their nearest vertical division.
Ctrl-right click to place the upper integration-range offset cursor used by the features above.
Important note: Like the single-point Spot Cursor, PN's trace-integration algorithm -- used whenever RMS noise, jitter, residual FM, or carrier/noise ratio values are displayed -- works on the displayed data after smoothing (if any) has been applied. This means that any changes you make to either the display resolution or smoothing level can affect the displayed values. Such effects are not usually very significant, but if repeatability is important, you may wish to make a note of the display resolution and smoothing level when logging your noise measurements.
Acquisition Dialog
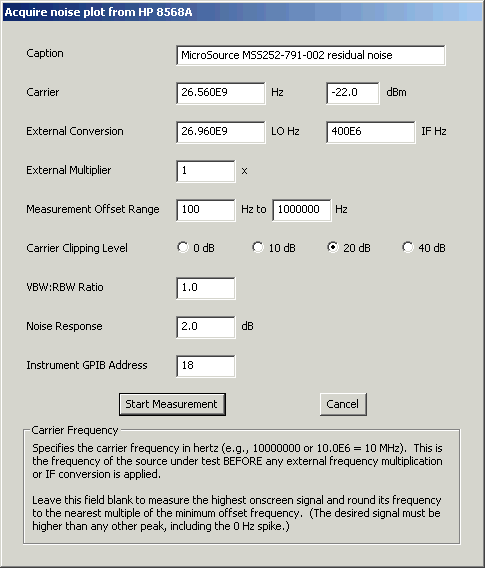
Selecting a spectrum analyzer model from the Acquire menu will bring up the Acquisition dialog box. Depending on the analyzer type selected, the acquisition dialog's appearance can vary slightly from the example below.
Caption specifies an optional caption for the trace being acquired. To display trace captions beneath the graph in the main window, select the Legend -> Trace option.
Carrier specifies the carrier frequency in hertz (e.g., 10000000 = 10 MHz). Scientific notation may also be used (e.g., 1.2E9 = 1.2 GHz). This is the frequency of the source under test, before any external frequency conversion or multiplication is applied.
With some analyzers, this field may be left blank to cause PN to select the highest onscreen signal for measurement. The desired signal must be higher than any other peak, including the 0-Hz spike if any. The selected frequency will be rounded to the nearest multiple of the minimum offset frequency.
You may also enter the carrier's amplitude level in dBm in the box to the right of the frequency field. This is the amplitude of the test signal as it arrives at the analyzer's input jack, after any external frequency conversion or multiplication is applied. You can leave this field blank with any analyzer model, but if the amplitude is known, specifying it here will reduce measurement time and improve repeatability.
The automatic carrier-detection feature is only as "smart" as the analyzer's marker functionality. It can fail to work properly if the 0-Hz spike or negative (mirrored) signals become visible while centering and zooming in on the desired signal.
External Conversion tells PN that the carrier is being mixed with an external LO signal to generate an IF within the spectrum analyzer's tuning range (or an optional frequency multiplier's input range). Both of these fields should be left blank if no external mixer is present. Otherwise, enter the LO frequency used to perform the conversion, followed by the IF at the mixer output where the measurement (or multiplication) takes place. More about indirect phase-noise measurements can be found in the FAQ.
External Multiplier tells PN that an external frequency multiplier (e.g., 2 for a doubler, 3 for a tripler...) is present at the spectrum analyzer’s RF input. Enter 1 here if no multiplier is present. Fractional values can be used to specify frequency division rather than multiplication (e.g., 0.125 for a divide-by-8 stage).
The use of an external xN multiplier improves the analyzer’s equivalent phase-noise floor by 20 x log10(N) dB. You can use a microwave "brick" source to multiply your test signal dozens of times if desired, but be sure you understand its loop-bandwidth and inband noise-peaking characteristics!
Measurement Offset Range specifies the minimum and maximum carrier offset frequencies in Hz. Offset frequencies are rounded to the nearest power of 10 and used to determine the left and right boundaries of the log-log plot.
The minimum offset frequency should be at least 3x the analyzer’s minimum resolution bandwidth, rounded up to the next decade. Minimum offsets below this limit will yield meaningless results. For instance, the Tektronix 494P's 30-Hz filter allows it to support minimum offsets down to 100 Hz, while the Tektronix 2782/2784's 3-Hz filter supports minimum offsets down to 10 Hz. Keep in mind, however, that the analyzer's filter skirt will have a pronounced effect on the trace if the requested minimum offset is not at least 10x the narrowest-available resolution bandwidth.
Most applications should specify 1 MHz as the maximum offset frequency.
Carrier Clipping Level specifies the amplitude offset above the analyzer’s reference level (top graticule line) at which the carrier will be positioned during the noise measurement. Clipping can improve the accuracy of measurements made near the analyzer’s LO or RF noise floor, at the risk of driving its front-end mixer into compression.
10 dB of clipping is recommended for most applications; 20 or 40 dB may be helpful on analyzers with 8-division displays such as the Tek 490 and HP 8590 series, or those with very low phase-noise floors such as the HP 8568A/B. The 40-dB option is also useful in suppressed- carrier measurements. Use caution at high signal levels!)
VBW:RBW Ratio specifies the video:resolution bandwidth ratio. This determines the compromise between measurement time and repeatability. Most applications will not need to change the default value of 1.0. Lower values can yield better repeatability – assuming the analyzer has warmed up thoroughly – but can take much longer to execute.
On some analyzers such as the Tektronix 490P/2750P series and HP 3588A/3589A, the VBW:RBW ratio is determined by the instrument's front-panel settings at the time the measurement is initiated.
Noise Response specifies the factor used to correct the measurement for the response of the analyzer’s RBW filters and video detector to Gaussian noise, plus any other system-level factors that require compensation. The noise-response value is added to all displayed data points.
PN's default noise-response value is 2 dB for many analyzers. Others, such as the Tektronix 490P/2750P and HP 3588A/3589A, maintain their noise-correction factors internally, so the default value for these instruments is 0 dB.
Instrument GPIB Address specifies the spectrum analyzer’s GPIB address as a decimal value. The default GPIB address for many of the HP analyzers supported by PN is 18.
Additional Instrument Notes
Tektronix 490P/2750P series The rear-panel LF-or-EOI switch must be set to '1' to use the GPIB Toolkit with all spectrum analyzer models in this series.
The earlier 492P and 496P analyzers do not use fully-synthesized tuning. As a result, you'll need to center the carrier signal manually prior to the beginning of each acquisition, even if you enter an explicit carrier frequency in the acquisition dialog. (The program will first tune the analyzer as close to the specified frequency as possible, so be sure to wait until you're prompted before you center the carrier.)
The 492P and 496P analyzers also don't compensate for errors in their IF center frequencies like the 494P and later models do, so accuracy in multi-decade measurements may be degraded.
HP 3585A/B Because the HP 3585A/B analyzers support only positive-peak detection, the VBW:RBW ratio in the Acquisition dialog should be set to 0.01 when high accuracy is required. This increases trace-acquisition time substantially, requiring up to 25 minutes for measurements between 10 Hz and 1 MHz. To speed up the acquisition process when absolute accuracy is not critical -- for example, when acquiring noise traces specifically for comparison with others from the same analyzer -- you can change the VBW:RBW default from 0.01 to 0.1 or even 1.0.
It is recommended that the HP 3585A/B's autoranging feature be turned off when using PN, especially when using carrier-clipping factors greater than 0 dB. (Use of carrier clipping may also cause the analyzer to report an overload condition; this is normal.) The REF LVL TRACK function should normally be left disabled.
Note that PN will disable auto-calibration and the error beeper while it is communicating with the HP 3585A/B, but it will not alter any other instrument settings, including autoranging and reference-level tracking, that are not directly associated with the measurement process.
Advantest R3261A: Prologix users may find it helpful to select 'Edit CONNECT.INI' in the GPIB configurator and set force_auto_read to 0, if invalid plots are returned from the analyzer.
Advantest R3264, R3267, and R3273 These analyzers can optionally use digital (FFT) filters to support resolution bandwidths down to 1 Hz. As a result, they are capable of PN acquisition at minimum offsets down to 10 Hz. However, their minimum offset is limited to 100 Hz (10 Hz RBW) unless digital filtering has been explicitly enabled with the Couple->RGB ≤100Hz ANLG/DGTL menu option.
By default, these digital filters are not enabled at power-up time; conventional analog filters are used instead. If you need to specify a 10-Hz minimum offset, you will need to enable the digital filters manually prior to beginning acquisition.
Due to ADC range limitations in the R3267 family, carrier clipping is ignored in spans acquired using the digital RBW filters.
Advantest R3132 series The default minimum offset with these analyzers is 10 kHz, corresponding to their standard 1-kHz minimum RBW filter setting. If your R3132-family analyzer has the optional 30-300 Hz RBW filters, you can specify minimum offsets down to 100 Hz.
Advantest R3131A It may be necessary to set write_delay_ms to 200 in the CONNECT.INI file (see below) when using a 2400-bps direct serial connection.
Keysight N9030A PXA These analyzers can be used by selecting the Agilent E4400 PSA/ESA acquisition option. Reports indicate good results with the VBW:RBW ratio left at its default setting of 1.0 and carrier clipping level set to 0 dB. Other settings and modes may not work properly.
CONNECT.INI
After installation of the GPIB Toolkit, your PC should also contain a file called CONNECT.INI, which tells the Toolkit applications how to take advantage of various GPIB connectivity options. These include direct RS-232 or TCP/IP links, as well as the Prologix GPIB-USB and GPIB-ETHERNET adapters.
If you have a Prologix adapter, you can review the comments in CONNECT.INI to learn how to configure PN and the other GPIB Toolkit applications to use it, or you can simply select your adapter in the GPIB configurator application (PROLOGIX.EXE) and press "Update CONNECT.INI" to automate the configuration process.
If the COM port specification in CONNECT.INI is commented out with a leading semicolon -- or if CONNECT.INI is missing entirely -- all GPIB Toolkit applications will attempt to communicate with the GPIB0 device via the National Instruments NI488.2 programming interface instead. This is the default behavior.
Note that some versions of Windows hide .INI file suffixes by default. In Windows 2000 and XP, for instance, CONNECT.INI may appear simply as "CONNECT," with the type "Configuration Settings." To turn off this behavior, go to the Tools->Folder Options->View tab in any Explorer window and deselect the "Hide file extensions for known file types" option. The exact location of CONNECT.INI will vary from one Windows installation to the next. It's often easier to select the "Edit CONNECT.INI" button in the GPIB configurator application than to try to locate the file yourself.
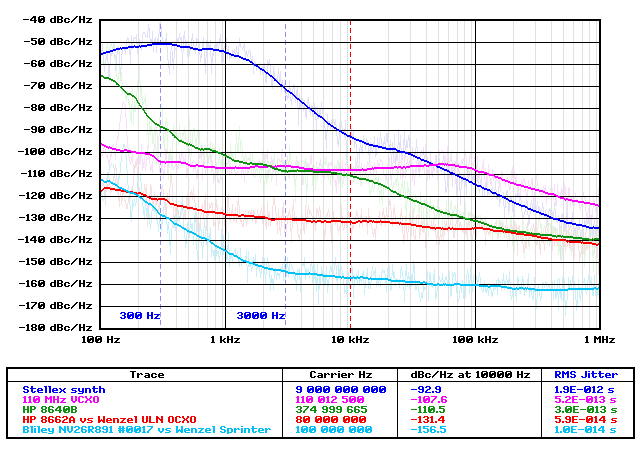
Analyzer Baseline Traces
Different analyzer models have widely-varying system noise characteristics that must be taken into account when making direct phase-noise measurements. In particular, the source being measured needs to be at least a few dBc/Hz "dirtier" than the spectrum analyzer's own LO subsystem, or the resulting measurement will reveal more about the analyzer's noise profile than that of the source under test! To avoid drawing misleading conclusions from your noise measurements, it's a good idea to display them alongside a baseline plot for the analyzer model you're using.
The C:\Program Files\KE5FX\GPIB directory where PN.EXE is installed by default contains a subdirectory called Composite noise baseline plots. This subdirectory contains a variety of .PNP files that can be loaded and displayed by PN.EXE. These files are representative baseline noise-floor plots for various spectrum-analyzer models. If your analyzer model isn't included, it isn't difficult to make your own baseline plot, as long as you have access to a strong CW signal that's significantly cleaner than the analyzer's baseline response when tuned near the measurement frequency of interest.
In the manual for their HP 85671A noise-measurement package, Hewlett-Packard recommends against using the analyzer's own calibrator for noise baseline plots. The analyzer's LO and calibrator are both derived from the same internal source, potentially leading to correlation effects that misrepresent the analyzer's true noise response. In a pinch, though, your analyzer's calibrator is most likely OK as a noise-reference source. I haven't noticed any meaningful differences when comparing baseline traces taken from various analyzer models' calibrators versus known-uncorrelated sources.
How to Make Good Composite-Noise Measurements
First, read the HP app note cited near the top of this document. Then, read this help file in its entirety. Noise measurement can be tricky -- it's easy to fool yourself (and others) into thinking that bad data is valid.
One hint: watch the analyzer's trace while PN is working, and try to keep the noise floor out of both the top and bottom graticule divisions. Use 10 dB or 20 dB of carrier clipping if necessary to keep the noise floor above the bottom of the graticule where the analyzer's amplitude accuracy is at its worst. Especially when taking baseline plots, don't measure sources weaker than -20 dBm or so.
Don't forget that you may need to manually select 0 dB of RF attenuation at the analyzer's front panel to keep its front-end noise figure from dominating measurements of weaker signals. And don't forget how easy it is to blow mixer diodes when you do this.
Release Notes
Release 0.90 of 7-Aug-05
Release 0.95 of 22-Aug-05
Release 0.96 of 5-Sep-05
Release 1.00 of 13-Dec-05
Acknowledgements and Additional Notes
The assistance (and patience) of Dave Robinson, WW2R, and Vladan Temer of Sonoma Instrument, are gratefully acknowledged.
Thanks to Dr. Alfredo Rosati, I5UXJ for his contribution of the Tektronix 2782/2784 support code, Magnus Danielson for HP 4195A support, and Dmitry Teytelman for HP 4396A/B support. Advantest TR4172 code provided by Stefan Heinzmann. Ron Kittel, K8AQC, and Grant Hodgman, G8UBN provided extensive help with development and testing on the HP 3585A. Matt Ettus of Ettus Research provided access to the Advantest R3267, and Jack Smith, K8ZOA of Clifton Laboratories provided access to the Advantest R3463. Advantest R3131A support code was provided by Piotr Kaczmarzyk. Darren Storer, G7LWT provided access to the Advantest R3361A, while Dimitry Borzenko, 4Z5CP, provided access to the Anritsu MS8604A.
The assistance of Had Allhands, K7MLR with the HP 3588A, Abdul Nizar with the Agilent E4402B, and David Upchurch with the N9030A is greatly appreciated.
Source code compilable with the free Microsoft Visual Studio Express package
No warranties, expressed or implied, are offered with this program.
Use at your own risk!